Sunday, 9 December 2012

OOTD: Oh Christmas Tree, Oh Christmas Tree ♥

Hey guys,

So today was a christmas shopping day, pretty chilled really as our main priority was getting our christmas tree for our lounge, we got a real one last year for the first time and I couldn't wait to go and choose one again this year. We started putting our decorations up last night and we put up one tree and decorations around the rest of the house but we just needed to get our hands on a lovely tree today to finish it off.

Here is the outfit I wore for the day....


A little bit windswept...
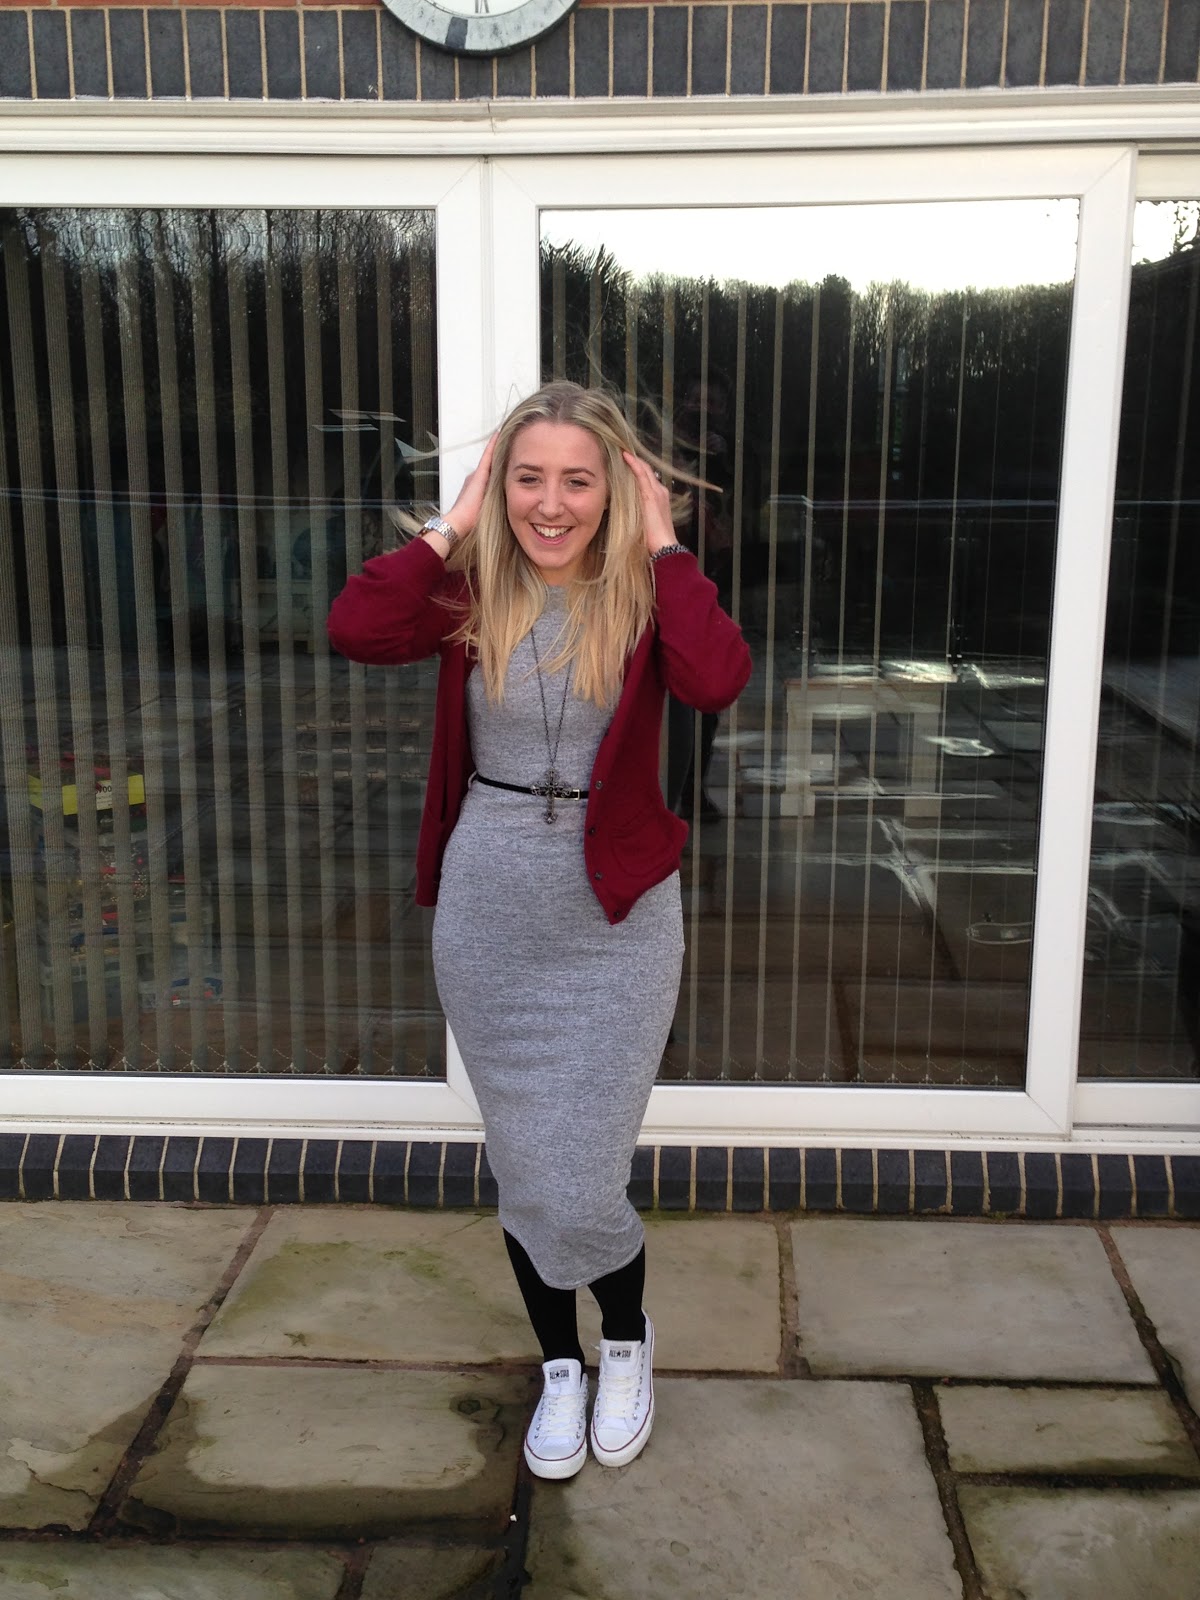


I bought my dress a couple of days ago from Primark, I only actually intended to go in for a onesie but I spotted this and knew I had to get it, I bought the necklace and studded bracelet too because they were next to the dress and I thought they'd all look lovely together, I can just imagine the bracelet going with so many outfits over the christmas season too! My watch is Michael Kors which was a graduation present from my sisters and my cardigan is from H&M, leather jacket is Wallis, fur headband is Miss Selfridge, pumps are Converse and scarf is Topshop (I think - it's my sister's). I kept my make up pretty simple with just my Dior foundation, a little bit of blusher and some brown eyeliner and make up, I didn't want a really full face as it was only a chilled out kind of day. I did wear my new Raspberry Pie lip butter but that was a last minute decision after the pictures.

I actually wore two pairs of tights because I didn't think one would be enough to keep me warm, and I very nearly didn't wear my headband, but I'm so glad I did because I was so cold and I think my ears would have actually fell off without it! The day was a success anyway and we chose a gorgeous tree, (I will put a photo on my instagram) and I even bought a lovely, snuggly christmas jumper... look at those cute little reindeers, awwh.

....Perfect for my skiing holiday after Christmas.

What do you think of my casual sunday outfit? What did you all do with your weekend?

Love 
x

Monday, 26 November 2012

Eyes Lips Face Brush Cleaner: Review ♥

Heyy guys,

I don't know about you but cleaning my make up brushes seriously is the bain of my life. It's just so time consuming and the more brushes you have the worse it is. It's just not a fun task. This is why I decided I needed to get myself a daily brush cleaner to keep my brushes hygienic and clean in between thorough washes. I'd heard lots of good things about e.l.f cosmetics, particularly the amazing prices so I thought I'd have a look there before splurging on the Mac cleaner I was considering buying. Needless to say, they sell everything on that website and for around £3-4 I spied this massive 250ml bottle, so it would have been pretty rude not to buy it really.

I use this cleaner every couple of days, not daily as it suggests because if I'm honest I don't have the time, although the spray head does make it SO easy quick to use.I just spritz a few times onto my make up brush and rub the brush with a clean cloth and then leave to dry for the rest of the day and then my brushes feel lovely and soft and fluffy again when I come to use it my foundation or concealer is applied much more evenly.

I'm in two minds about its scent...you can sort of smell the anti-bacterial ingredients in it (if that makes sense) because it smells a bit like germ spray/gel for your hands, which is good because I know that it's probably doing a good job killing germs and it smells like it's actually deeply cleaned, although it makes me feel a bit sicky if I use it too much all at once because it's quite strong. The after-smell on the brushes once they've dried isn't strong though and it leaves them smelling quite fresh, and it certainly hasn't done anything bad to my skin which can sometimes be quite sensitive. The consistency is just like water as well so it's really easy to spray and coats the brush enough to know how much you're using, I hate products with a spray nozzle that don't spray evenly because they're too thick to come out. Overall I'm a happy bunny with this cleaner as for around the £3-4 mark it's an absolute bargain for such a large bottle I think. I've had it a couple of months now and Ive still got loads left. The good thing about cleaning my brushes regularly with it means I don't need to use lots every time because they're pretty clean with only a couple of days worth of make up on them (handy tip there) so it saves me pennies in the long run.


The bad news is I think they've downsized the bottle online, unless it's sold out because I couldn't find this bottle when I looked but it's still only £3.75 so it's still a bargain compared to others on the market.

Have you ever tried this brush cleaner? What do you think? What other brush cleaners would you recommend?

Love 
x

Tuesday, 20 November 2012

Shellac Manicure: Review ♥


Hey beauts,

So I'm currently off work ill and as I've not left my bed all day, I needed a bit of cheering up (there is NOTHING good on tv in the day) so I thought a little post about my current Shellac mani would be a good way to take my mind off being poorly.

I've had a pretty busy couple of weeks, what with my graduation and then a wedding and an awards ceremony, so I obviously wanted my nails to look as perfect as possible. I was tempted to get acrylics again, but they really ruined my nails in summer so I opted for a Shellac manicure instead. I had french tips done for my graduation and was really pleased with how they looked....however, the day after my graduation, the polish started to peel away from the sides on both my index fingers which was so disappointing as they were supposed to last up to three weeks

I went back to the salon and they said that it shouldn't have happened and the UV light which they put them under to dry might not have set them properly down the sides of the nail beds so I went back and had them done free of charge. The second time I had them done I had them painted a full colour instead of french tips as the beautician said this would be stronger, so I went for black nails and a silver accent nail with tiny black gems to go with the two dresses  I was wearing for the wedding and awards evening.

Here is the picture I instagrammed straight after having them done so my cuticles are still a bit oily...

This time they've lasted perfectly and even when I've knocked them or scraped them they haven't even chipped, which is amazing because usually no matter how many top and bottom coats I apply to my nail polish it still chips within a day. They're still beautifully shiny and smooth which I love because I find that normal polish usually goes quite dull after a while and I can't see them chipping anytime soon, they're definitely as strong as they should be this time. I paid £30 for the manicure, which is quite expensive but it does take about an hour and they last up to three weeks so in my opinion it is worth it if you've got some pennies to splash or you have a nice event to look forward to.

I'd definitely recommend them to anyone considering having something a little bit different on their nails, there are some gorgeous festive colours like red and gold glitter which I definitely fancy trying after this. They also protect your nails unlike having gel or acrylic nails put on as you get given a cuticle oil to massage on daily which protects the nail underneath and doesn't result in ridges or thin nails like acrylics. Although they don't add length, it doesn't matter because short nails look just as glamourous as long talons would. All in all I'm really happy with them now I've got a colour on and I can't wait to try out the different range of colours.


Have you ever had a Shellac manicure? What do you think of my nails?

Love 
x

Tuesday, 13 November 2012

How to wear: Knee High Boots ♥

Hey lovelies,

I don't think I've ever done one of these posts before, but I love reading them, and considering I recently added a new pair of boots to my shoe collection, I thought I'd do a little 'how to style' post.

I love knee high boots for this autumn/winter, they're so practical and keep my little toes warm in the cold weather and they look great with any outfit to make a change from ankle heeled boots like my Ambush boots from Topshop. Here are a few ideas of what you can team them with...

Date night: Playsuit-Boohoo, Leather jacket-Topshop, Clutch bag-Topshop, Bracelet-River Island, Rings-River Island, Tights-Topshop, Boots-Asos

Shopping: Fur Gilet-Topshop, Jumper-Miss Selfridge, Coated Skinny Jeans- Warehouse, Bag-River Island, Heart Necklace-Topshop, Boots- Asos.
Outdoors: Wax Jacket- Barbour, Bag- Mulberry Del Rey, Skinny Jeans-Topshop, Scarf- Barbour, Jumper-Barbour, Fox Necklace-River Island, Boots- Asos

Out for Dinner: Dress-Miss Selfridge, Necklace-Miss Selfridge, Nail Polish- Nars Dovima, Bag- Asos, 
Ring-Miss Selridge, Tights-Topshop, Boots-Asos


What do you think of these outfits I've put together? Do you own any knee high boots for this season?

Love
x

Monday, 15 October 2012

Impress Nails: Review ♥

Hey beauties,

I was thinking of what better way to start posting again than with a good old review of a product I recently tried out. Throughout the summer I had gel nails with a white tip, so that I could paint them when I liked or go for the simple and classy french mani look for the rest of the time. Obviously as they started growing out they looked a mess and my plan was to just keep getting them done, until my last few pennies had to go on other holiday essentials like clothes and I couldn't afford. As my nails were in such terrible condition from being gelled and filed until they were almost non-existent, I needed something to glam them back up again, so I tried out Impress Nails.

I'd heard a lot about this brand on the internet and had wanted to try them at the start of summer but I couldn't because of my gel nails, so as a much cheaper alternative (£8.99 compared to £25 for new gels!) I got them for my holiday to Spain. I applied them the day that I left for the airport and they were SO easy to apply, all you have to do is choose the appropriate size, peel back a sticker and press on to the nail and voila! Beautiful nails! The ones I chose were in the colour 'Lovestruck' and were so cute and girly, perfect for a summer holiday, but Boots, where I bought them had so many different colours and styles it was actually quite hard to choose.


This is the photo I instagrammed from the airport! Impress Nails - Lovestruck - £8.99

In terms of staying power, this is where I had a few problems...because of my gel nails, some of my nails ended up quite uneven on the surface, with quite big ridges in them so sadly the nails didn't stick very well to those. I think it was one thumb and one index finger that had the biggest problem and came a bit loose. The rest of the nails stuck so well though and when it came to taking them off after losing a couple, they were quite tough to get off, even after travelling all day and washing my hands numerous times. So overall, I was really impressed with the staying power to say it's just a sticky back and no glue is required. It was only my nails which made them loose, nothing to do with the product itself.

I'd definitely buy these nails again, and I'm patiently waiting for my nails to grow properly and the ridges to grow out, I'm thinking the rich, red colour 'Tweetheart' for the autumn and winter months!

What do you think of this speedy manicure? Have you ever tried Impress Nails?

Love
x

Saturday, 13 October 2012

We're Going Through Changes ♥

Hello lovelies,

I've been a bit of a naughty blogger lately and haven't posted in aaageees! But, I have got a few excuses...1) I now work full time, and my body has found it hard to adjust to the early mornings so I've been absolutely shattered every night, so firstly, not much shopping for new goodies to talk about, and also not much energy to even write or take pictures.. 2) I've been hating on my blog design for a while so I guess I've been avoiding it at the same time. I've changed things up a bit now though and I'm feeling the love for my blog and writing new posts again, so watch this space...I'll be back to normal very soon! I feel a shopping spree coming on...

(I do still exist...)

Love
x

Wednesday, 29 August 2012

How to: Dip Dye Denim Shorts

Hey lovelies,

So with my holiday coming up (the one that I'm now actually on) I decided to get a bit creative and taking some inspiration from Kirsty at Bows and Belles and her dip dye denim shirt post, I decided to re-vamp my old and unused denim shorts. They were pretty plain, dark denim and I never wore them so I had nothing to lose if it didn't work. I did it all for free as I just used what I had at home and have to buy anything so it was a really cheap and easy process which only took a couple of hours.

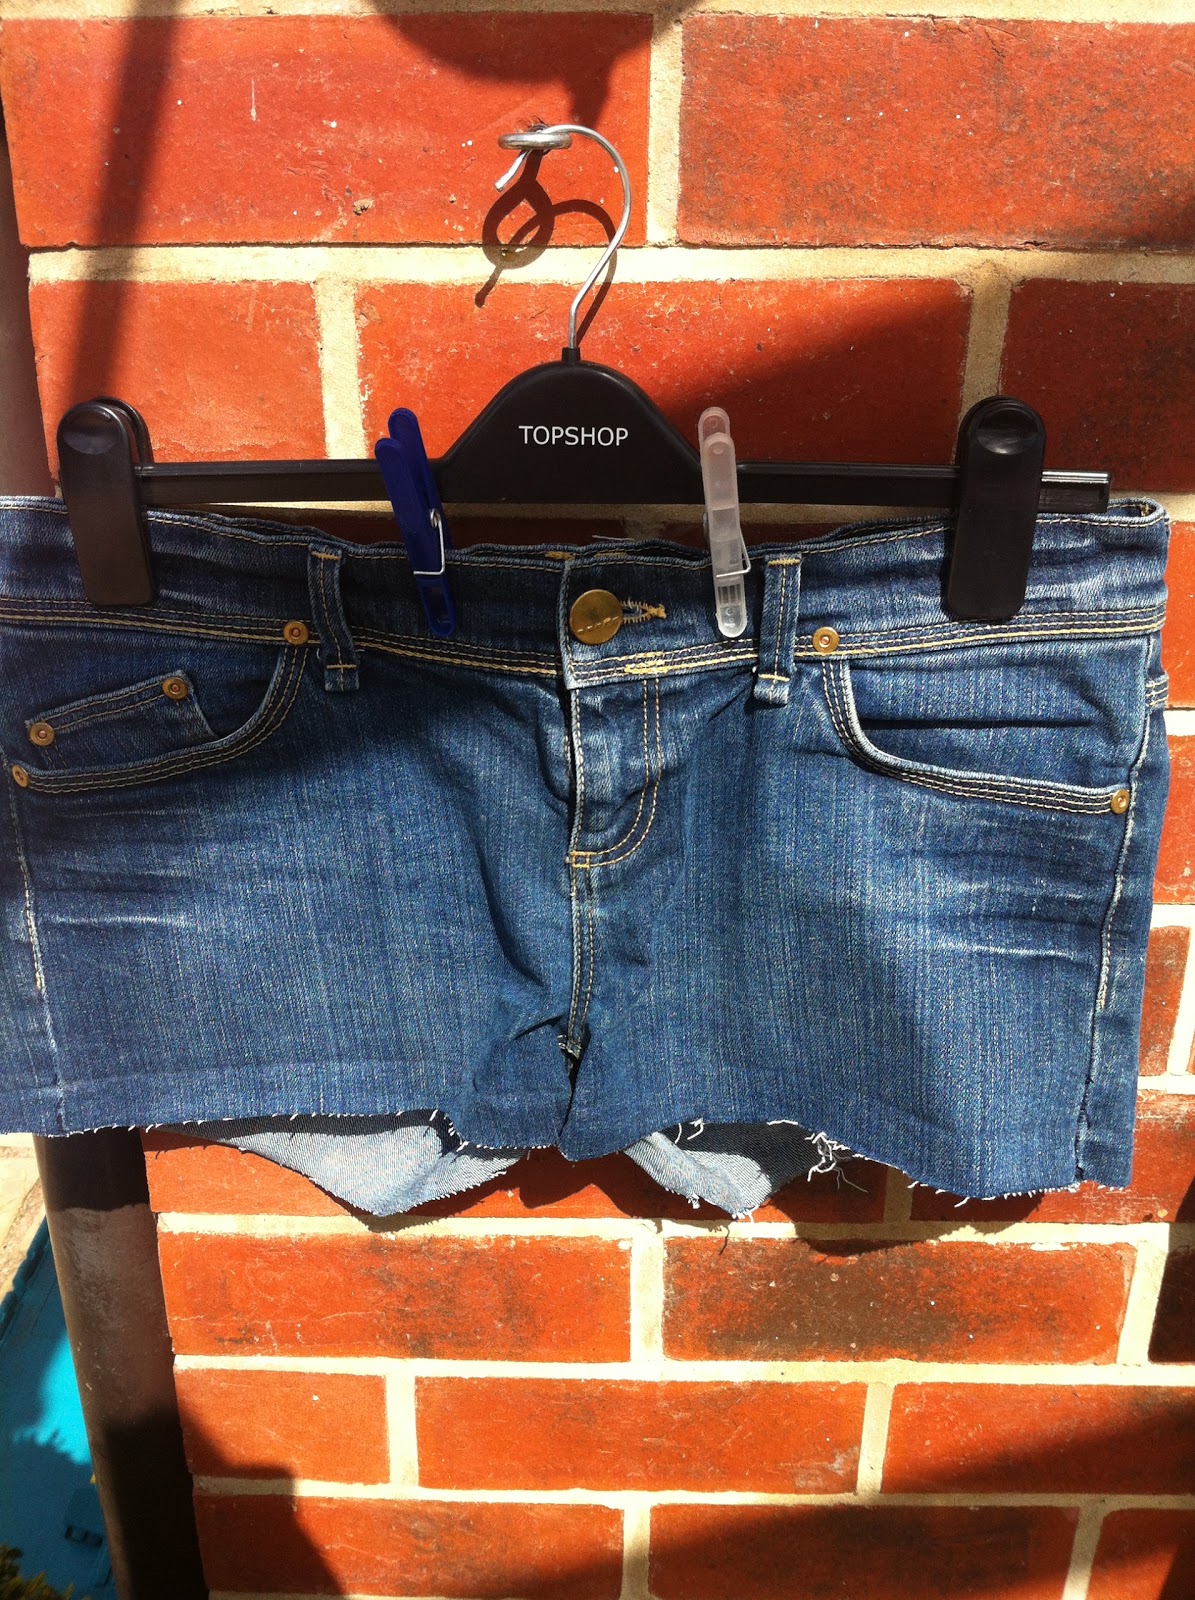
Firstly I cut my shorts as the hems were originally rolled up, so I unpicked the stitching and snipped away until they were at the length I wanted. I then folded the shorts in half and put a clip coat hanger on the shorts at the top so that they were level all the way across the bottoms.


I then filled a sink bowl with two bottles of Domestos bleach ( I did try one but it wasn't enough for how high I wanted the dye to go) and placed the shorts in the bowl so that just under half was immersed in the bleach.


I left them soaking and went back to check on them every 15 minutes or so to check their progress. Altogether it took about 1 hour 50 minutes to get them the white shade I wanted at the bottom. After about 1 hour-ish, it went a light blue which did look nice but I wanted it a bit lighter so left it.


As soon as they were white enough, I placed them in another bowl in the sink and ran cold water all over them before putting them in a bowl of cold water and white vinegar. I used a whole bottle of this to stop the bleach dying and running and then I put them in the washing machine for two washes.


Once they were dry I cut them up a bit more and using a nail buffer I rubbed over where I had cut to give it a bit more of a ragged-y look and hey presto, brand new looking shorts that are much more fashionable than they previously were and for free as all of the bits I needed were already at home.


The finished result...


What do you think of my new shorts? Is this something you'll try at home?

Love 
x
Related Posts Plugin for WordPress, Blogger...